> For the complete documentation index, see [llms.txt](https://docs.discordtotelegram.com/llms.txt). Markdown versions of documentation pages are available by appending `.md` to page URLs; this page is available as [Markdown](https://docs.discordtotelegram.com/fundamentals/whitelist-create-and-management.md).
# Whitelist: Create And Management
The **Whitelist** feature allows you to define a list of **approved users, groups, or channels** whose messages will be forwarded. This ensures that only content from specific sources is included in the forwarding process, helping you filter and control message flow effectively.
***
### **How It Works**
* When you add a user, group, or channel to the **Whitelist**, their messages will be forwarded.
* Messages from sources **not on the Whitelist** will be ignored.
* If no Whitelist is set up, messages from all sources are forwarded (unless other filters like Blacklist are applied).
***
### **1. Accessing the Replace Feature**
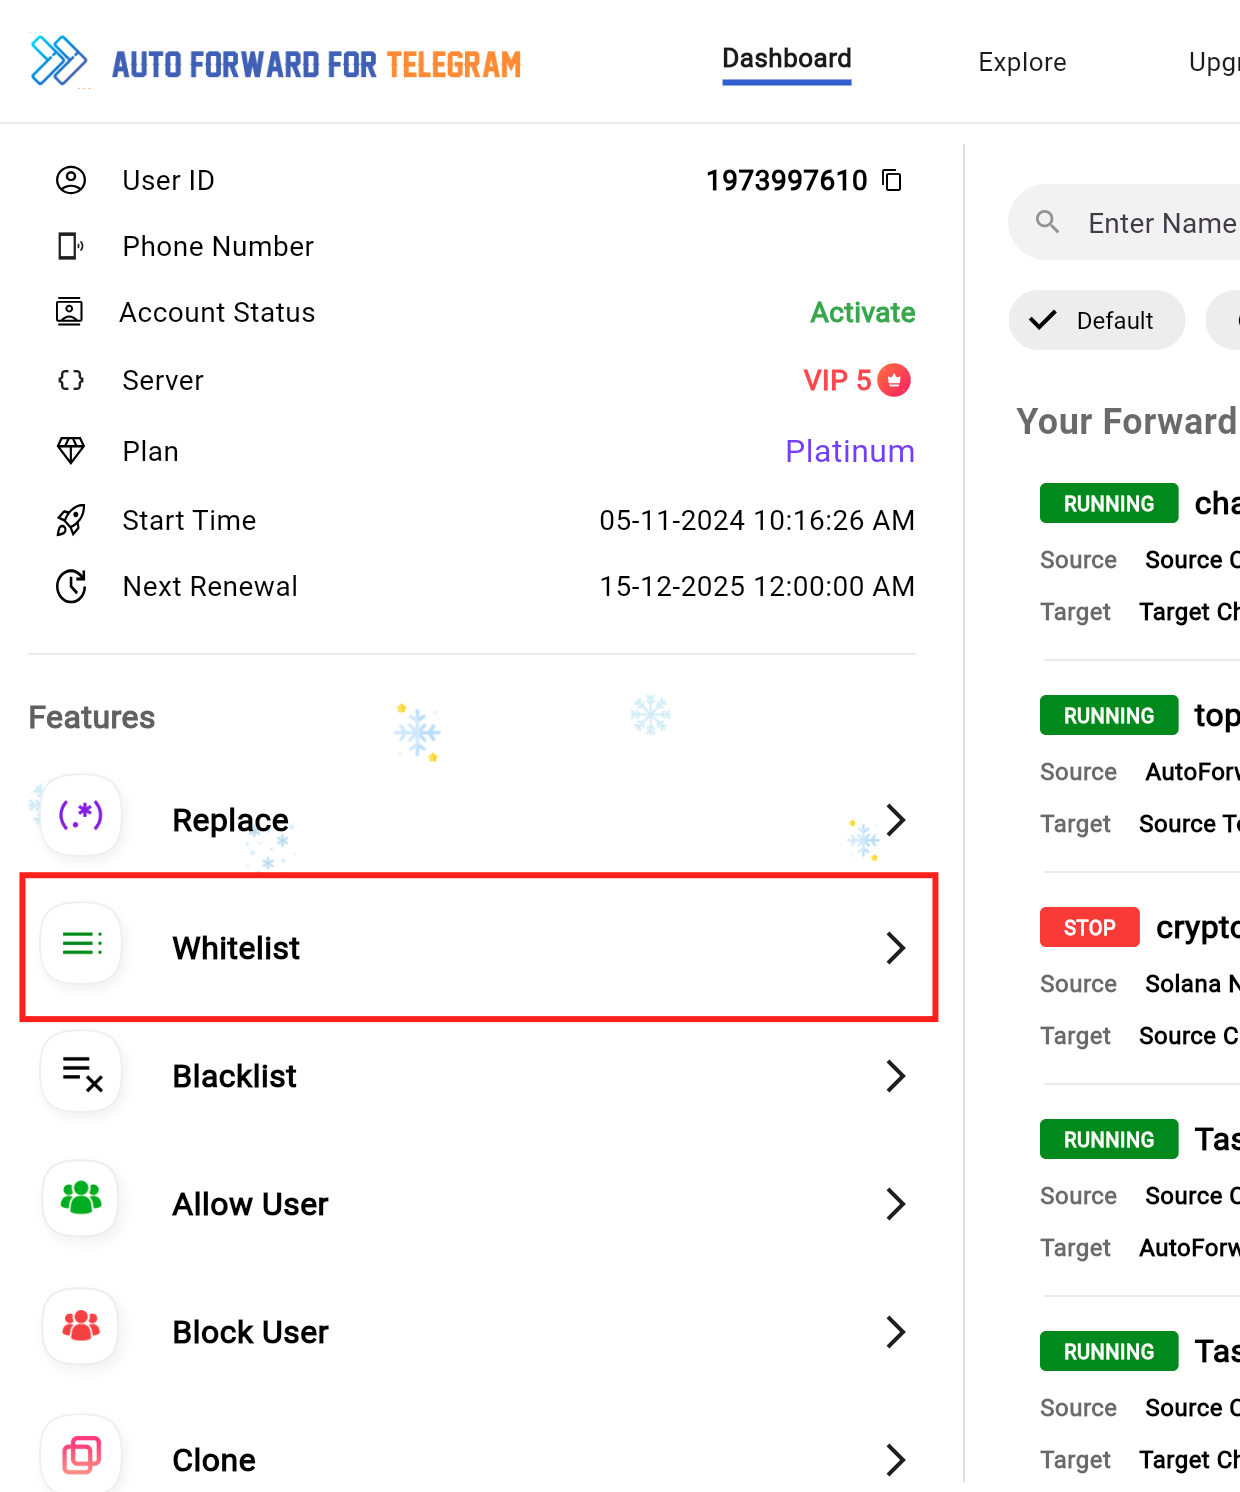
1. Log in to the [Auto Forward Web](https://web.discordtotelegram.com/) Dashboard.
2. In the left-hand menu under **Features**, click on **Whitelist**.
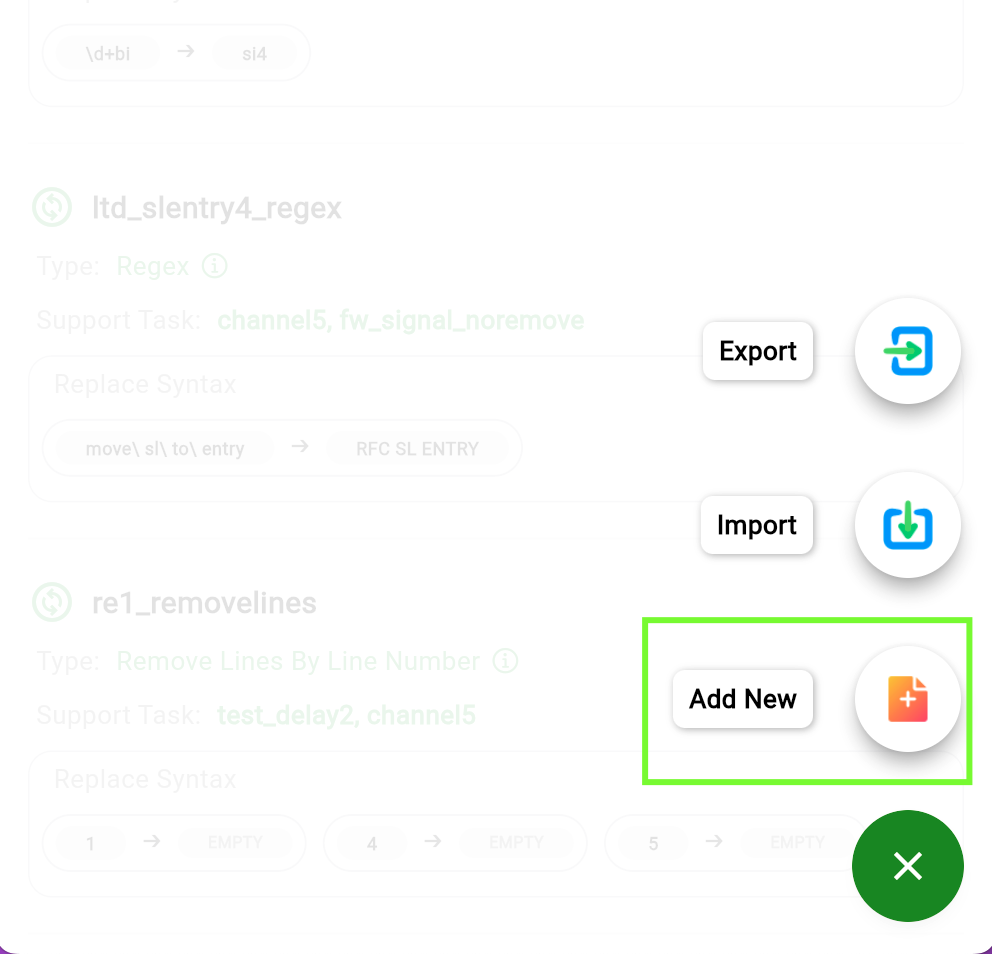
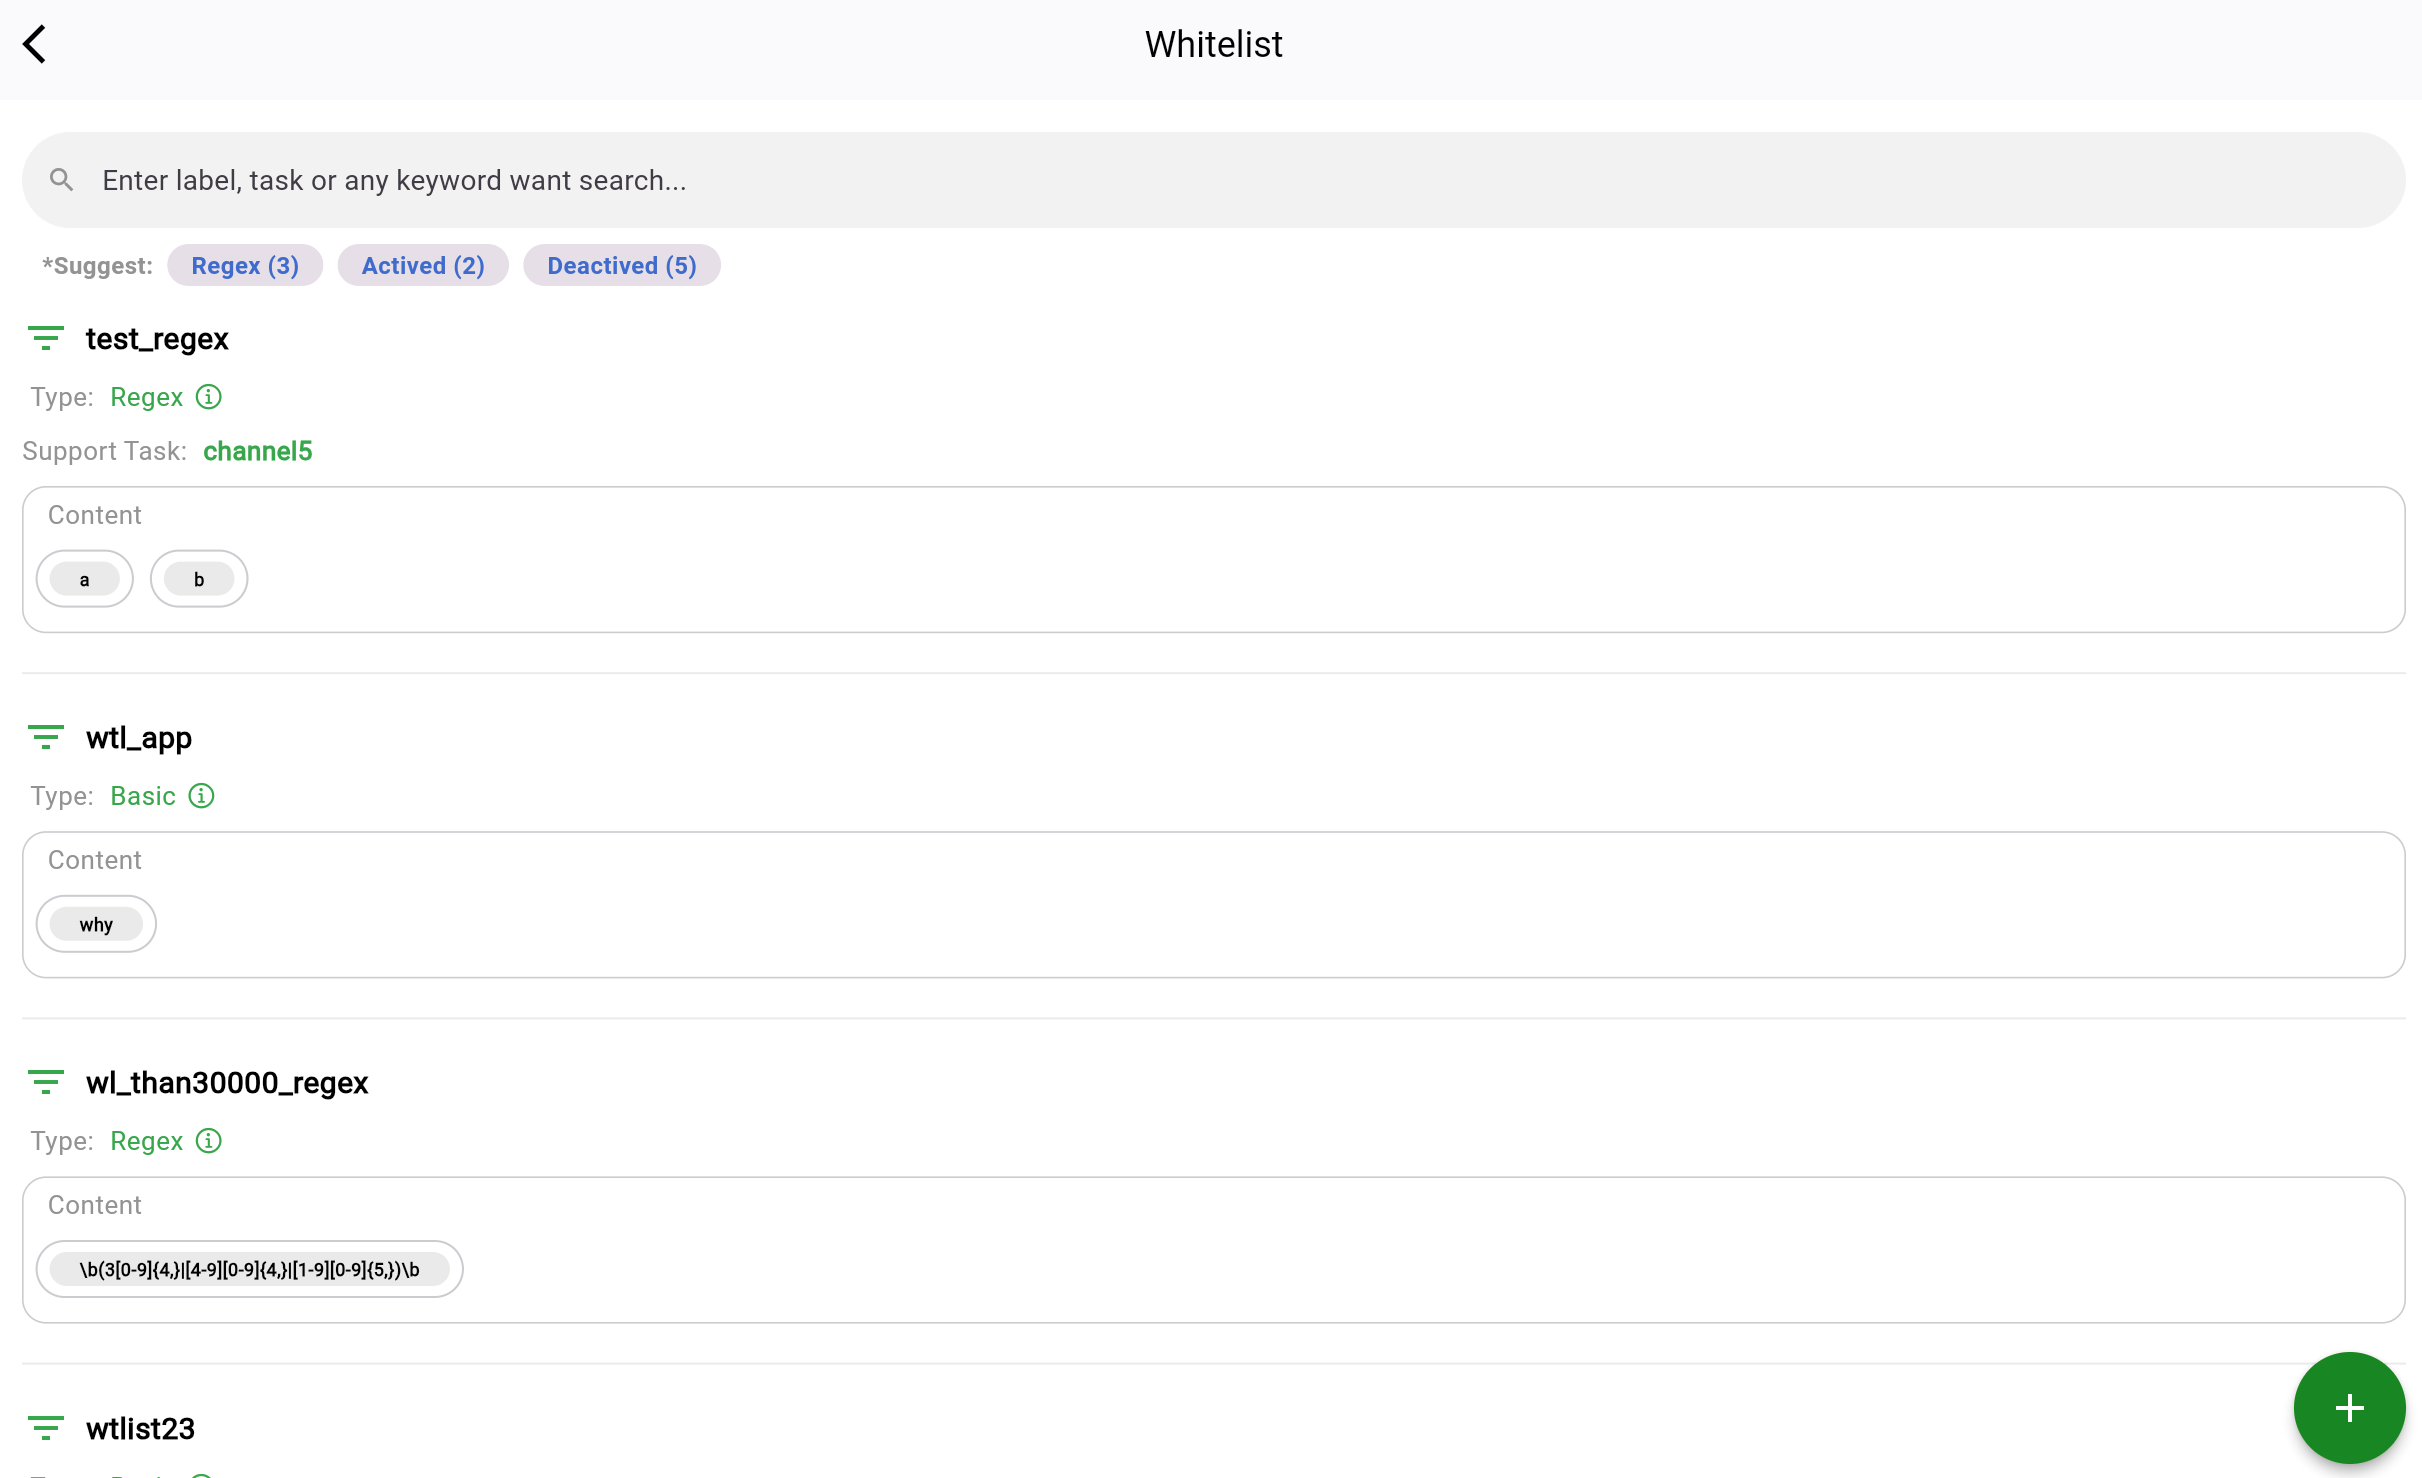
Next Tap on the **Add New** button (as shown in the image below):
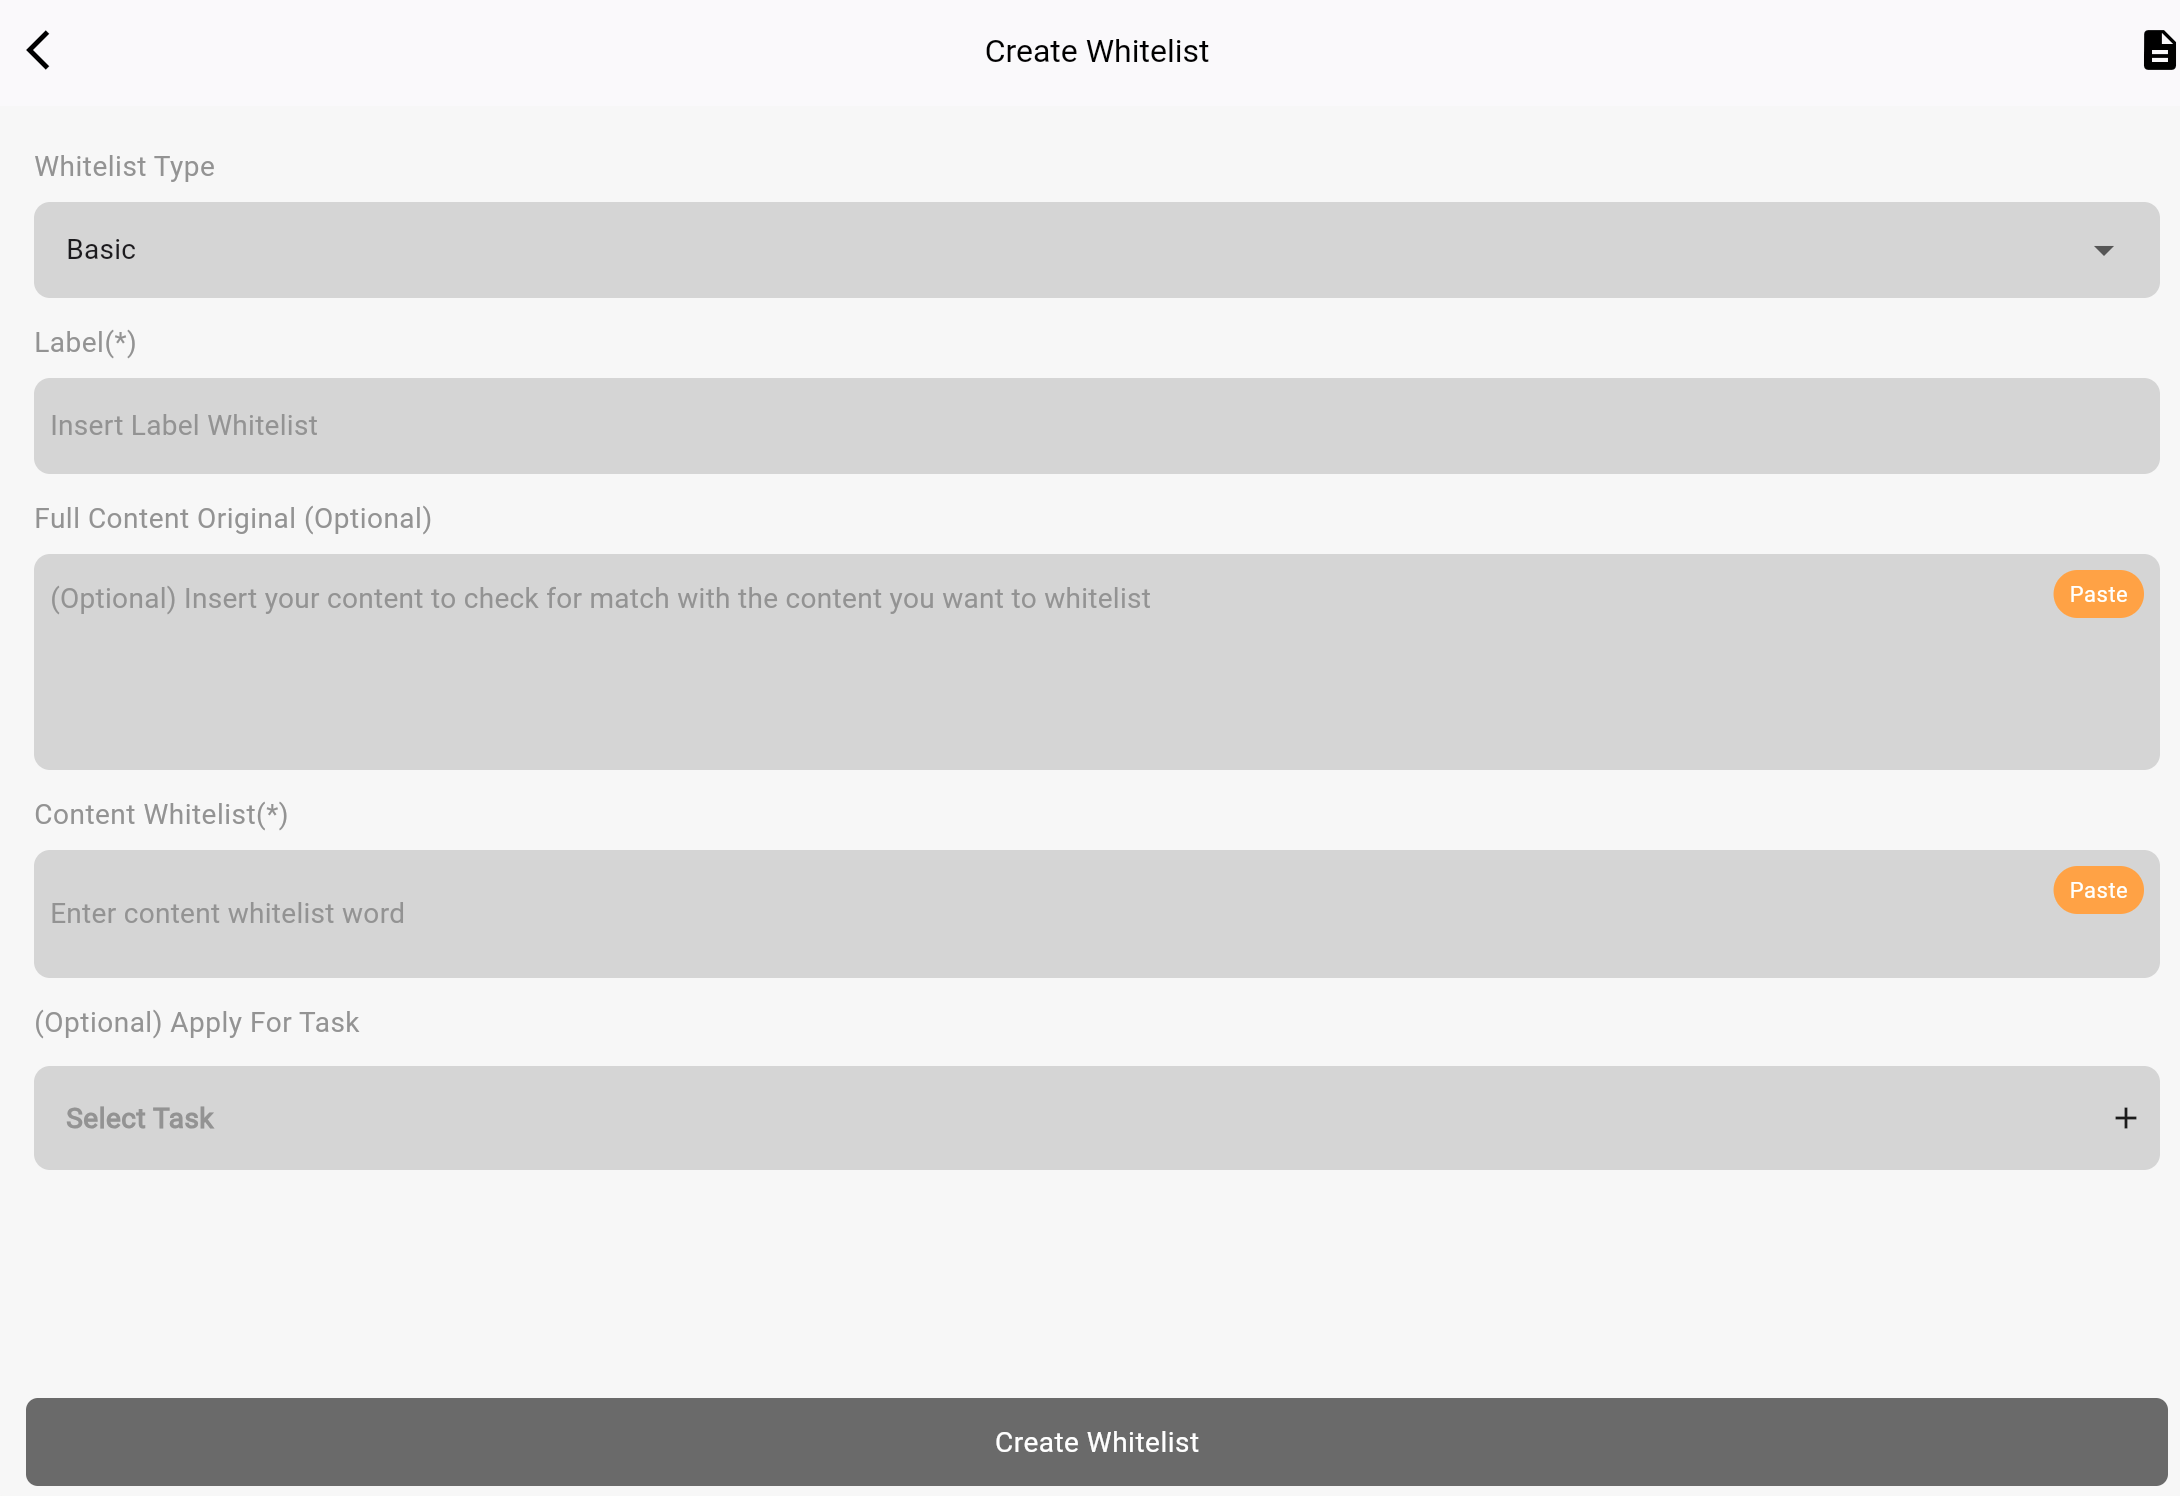
## **2. Create Whitelist Rule**
### **Options Whitelist Type**
You can choose one of the following **Whitelist Types**:
* **Basic**: Add simple words or phrases to the whitelist.
* **Regex**: Use Regular Expressions (Regex) for advanced filtering.
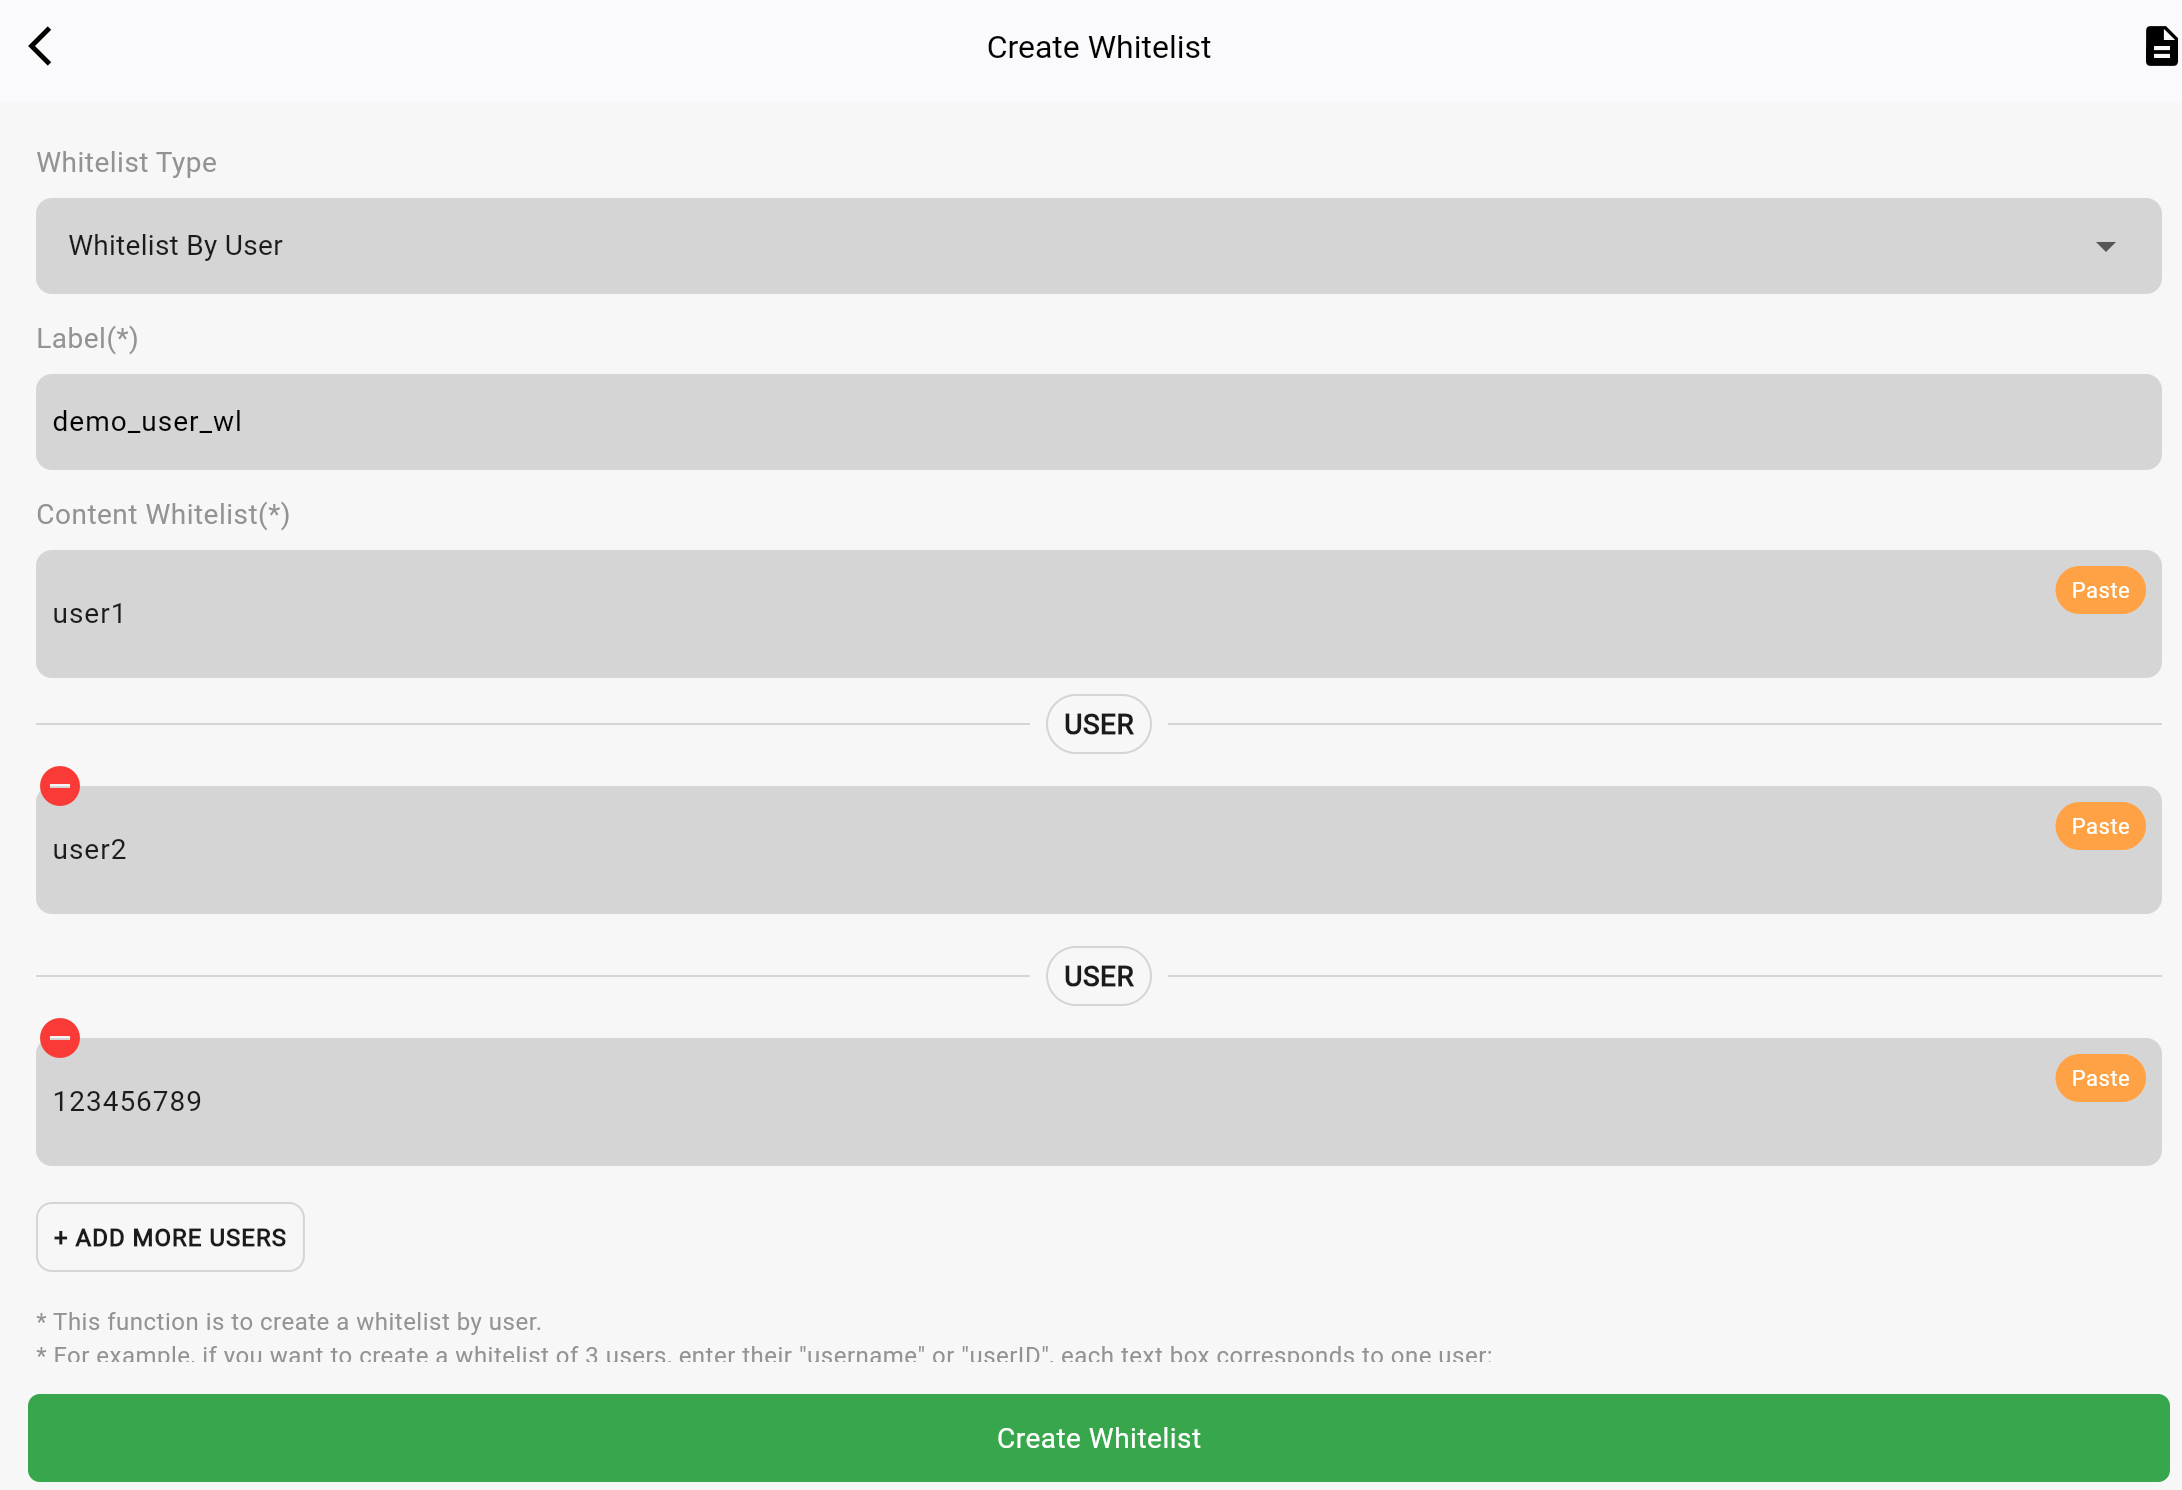
* **Whitelist by User**: Whitelist messages from specific users.
### **1. Enter a Label**
* Add a **Label** to identify your whitelist rule.
* Example: `trusted_words` or `filter_links`.
### **2.** Select Whitelist Type
* **Basic**: Enter one or more words (separate them with commas).
* Example: `hello,cat,dog`.
* **Regex**: Use a regex pattern for advanced filtering.
* Example: `\bhello\b` (matches the word "hello" fully).
* **Whitelist By User**: Add usernames or user IDs to whitelist specific senders.
### **3.** Full Content (Optional)
* You can paste the original content to test or match against the rule.
### **4.** Apply to Tasks (Optional)
* In the **Apply For Task** field, select a specific task if needed.
### **5. Save the Rule**
* Tap **Create Whitelist** to save and activate the rule.
## **4. Whitelist Type**
### **1. Basic Whitelist**
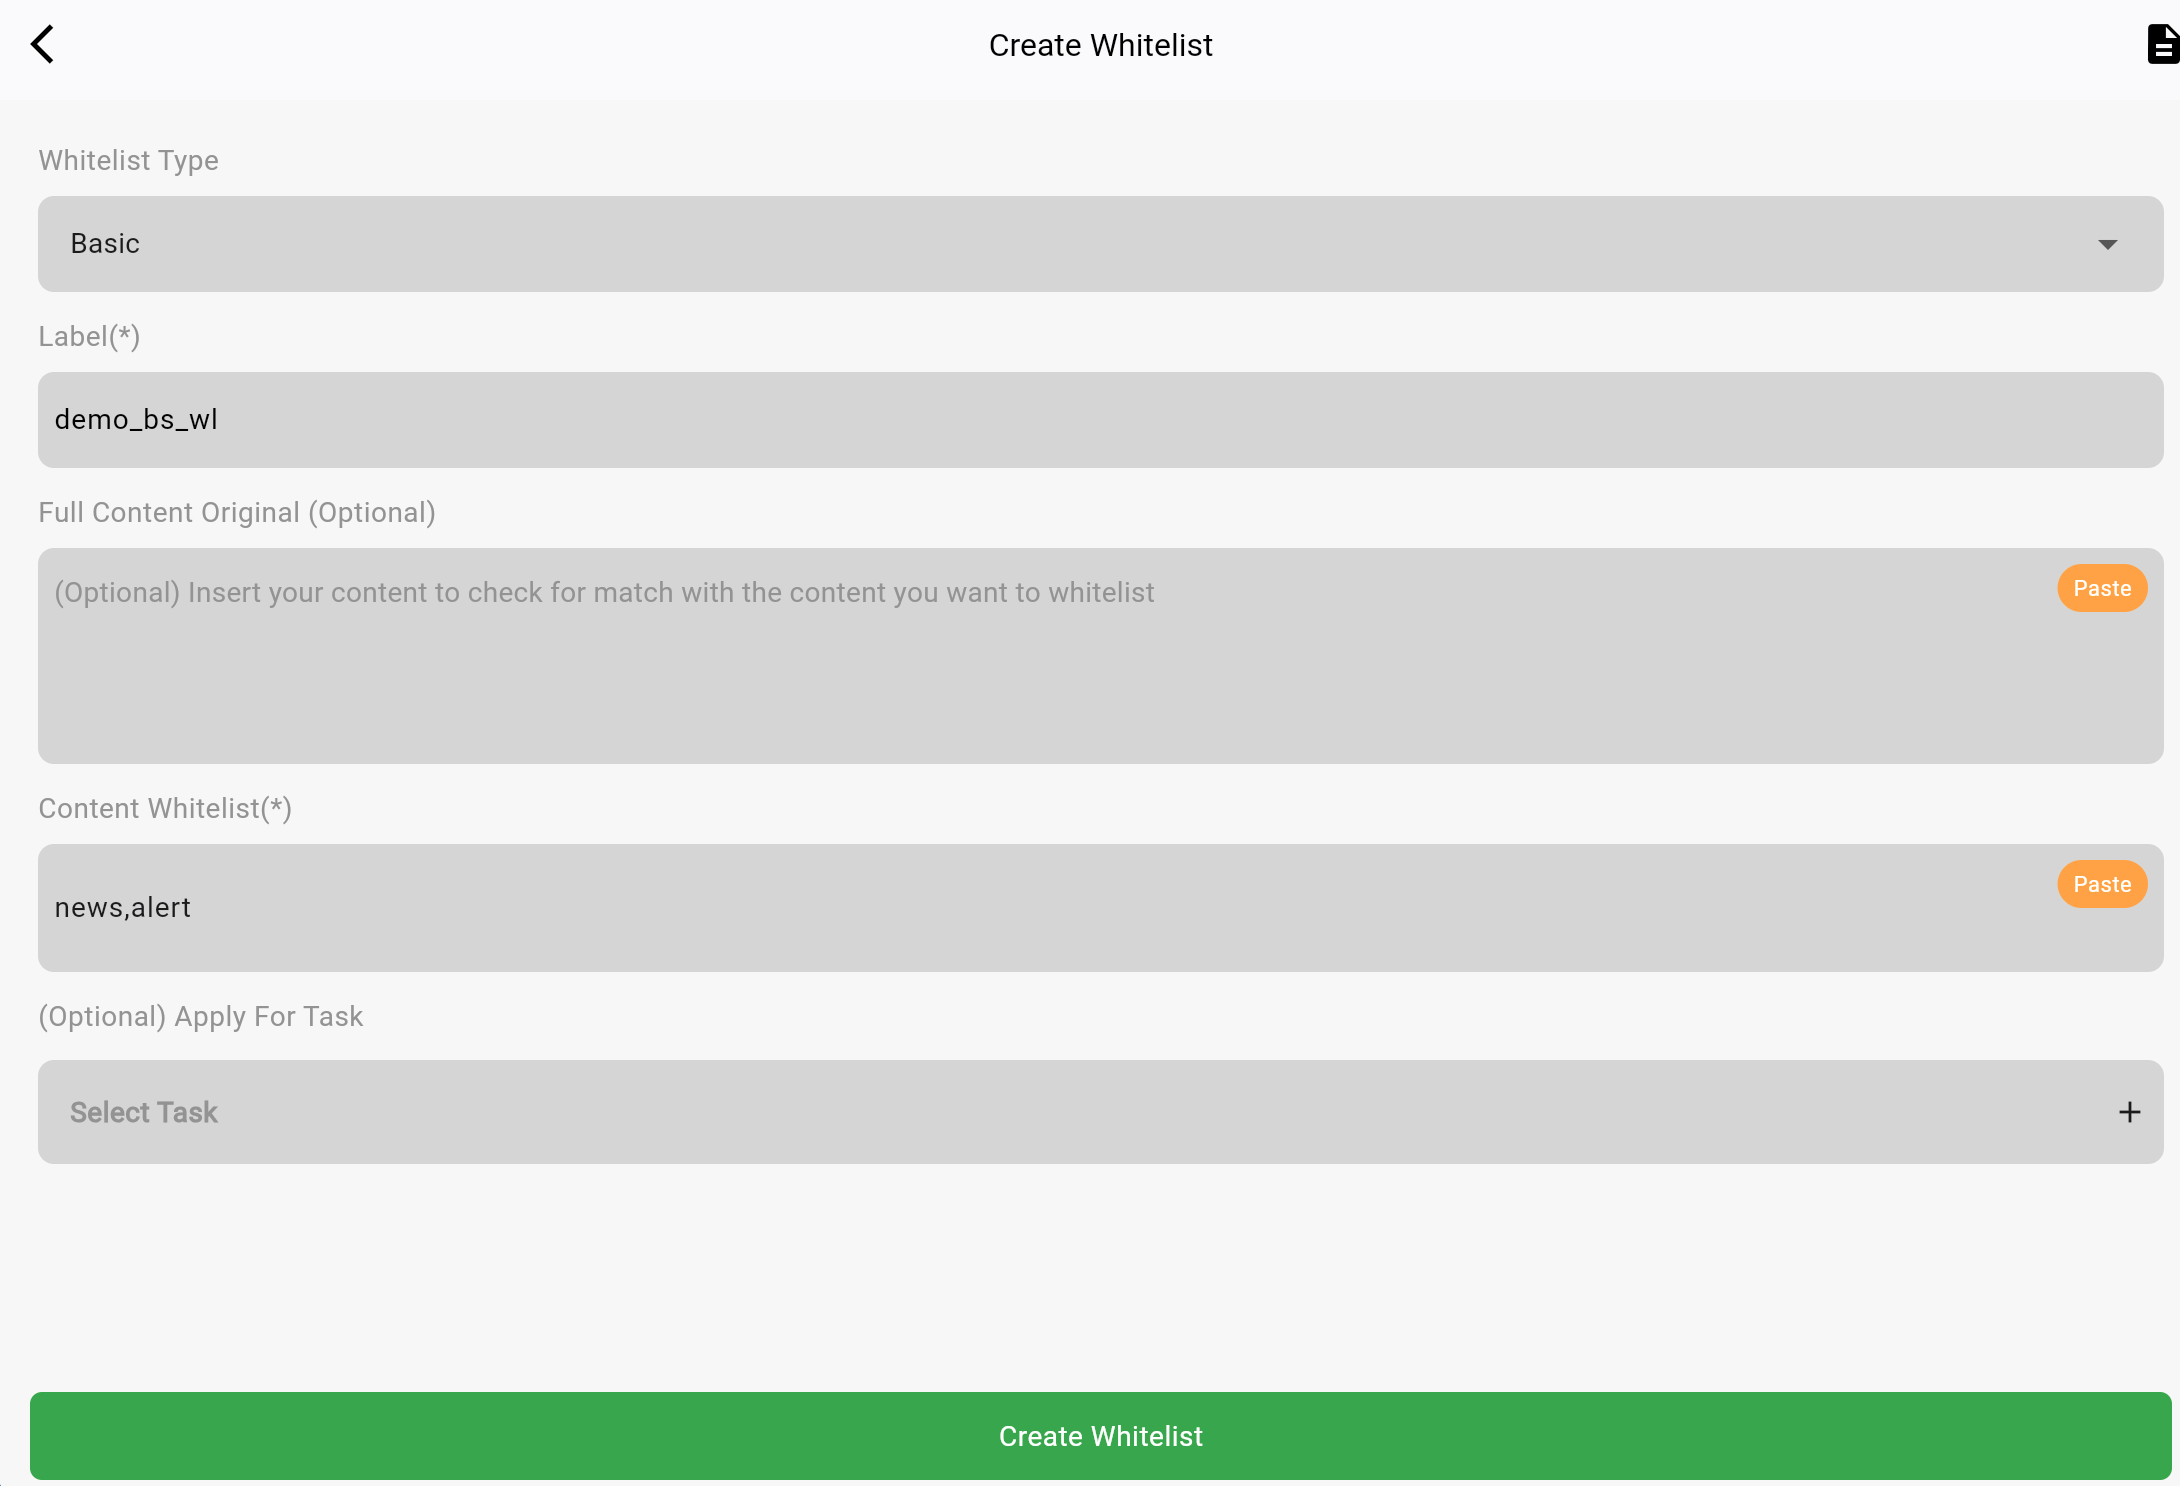
The **Basic Whitelist** allows you to forward messages containing specific words or phrases.
#### **Steps to Use**
1. Go to **Whitelist** → Tap **Add New**.
2. Select **Basic** in the **Whitelist Type** dropdown.
3. Add the words/phrases to the **Content Whitelist** field.
4. Tap **Create Whitelist** to save.
**Example Scenarios**
* **Forward messages containing "news" or "alert"**
* **Content Whitelist**: `news,alert`
* **Example Message**:
```csharp
Breaking news: Market is rising fast!
```
* **Result**: Forwarded ✅
* **Forward messages containing "update" or "report"**
* **Content Whitelist**: `update,report`
* **Example Message**:
```sql
Daily update: Please check the sales report.
```
* **Result**: Forwarded ✅
***
### **2. Regex Whitelist**
The **Regex Whitelist** is used for advanced matching. It allows you to use **Regular Expressions** to filter messages based on patterns.
#### **Steps to Use**
1. Go to **Whitelist** → Tap **Add New**.
2. Select **Regex** in the **Whitelist Type** dropdown.
3. Enter the **Regex pattern** in the **Content Whitelist** field.
4. Tap **Create Whitelist** to save.
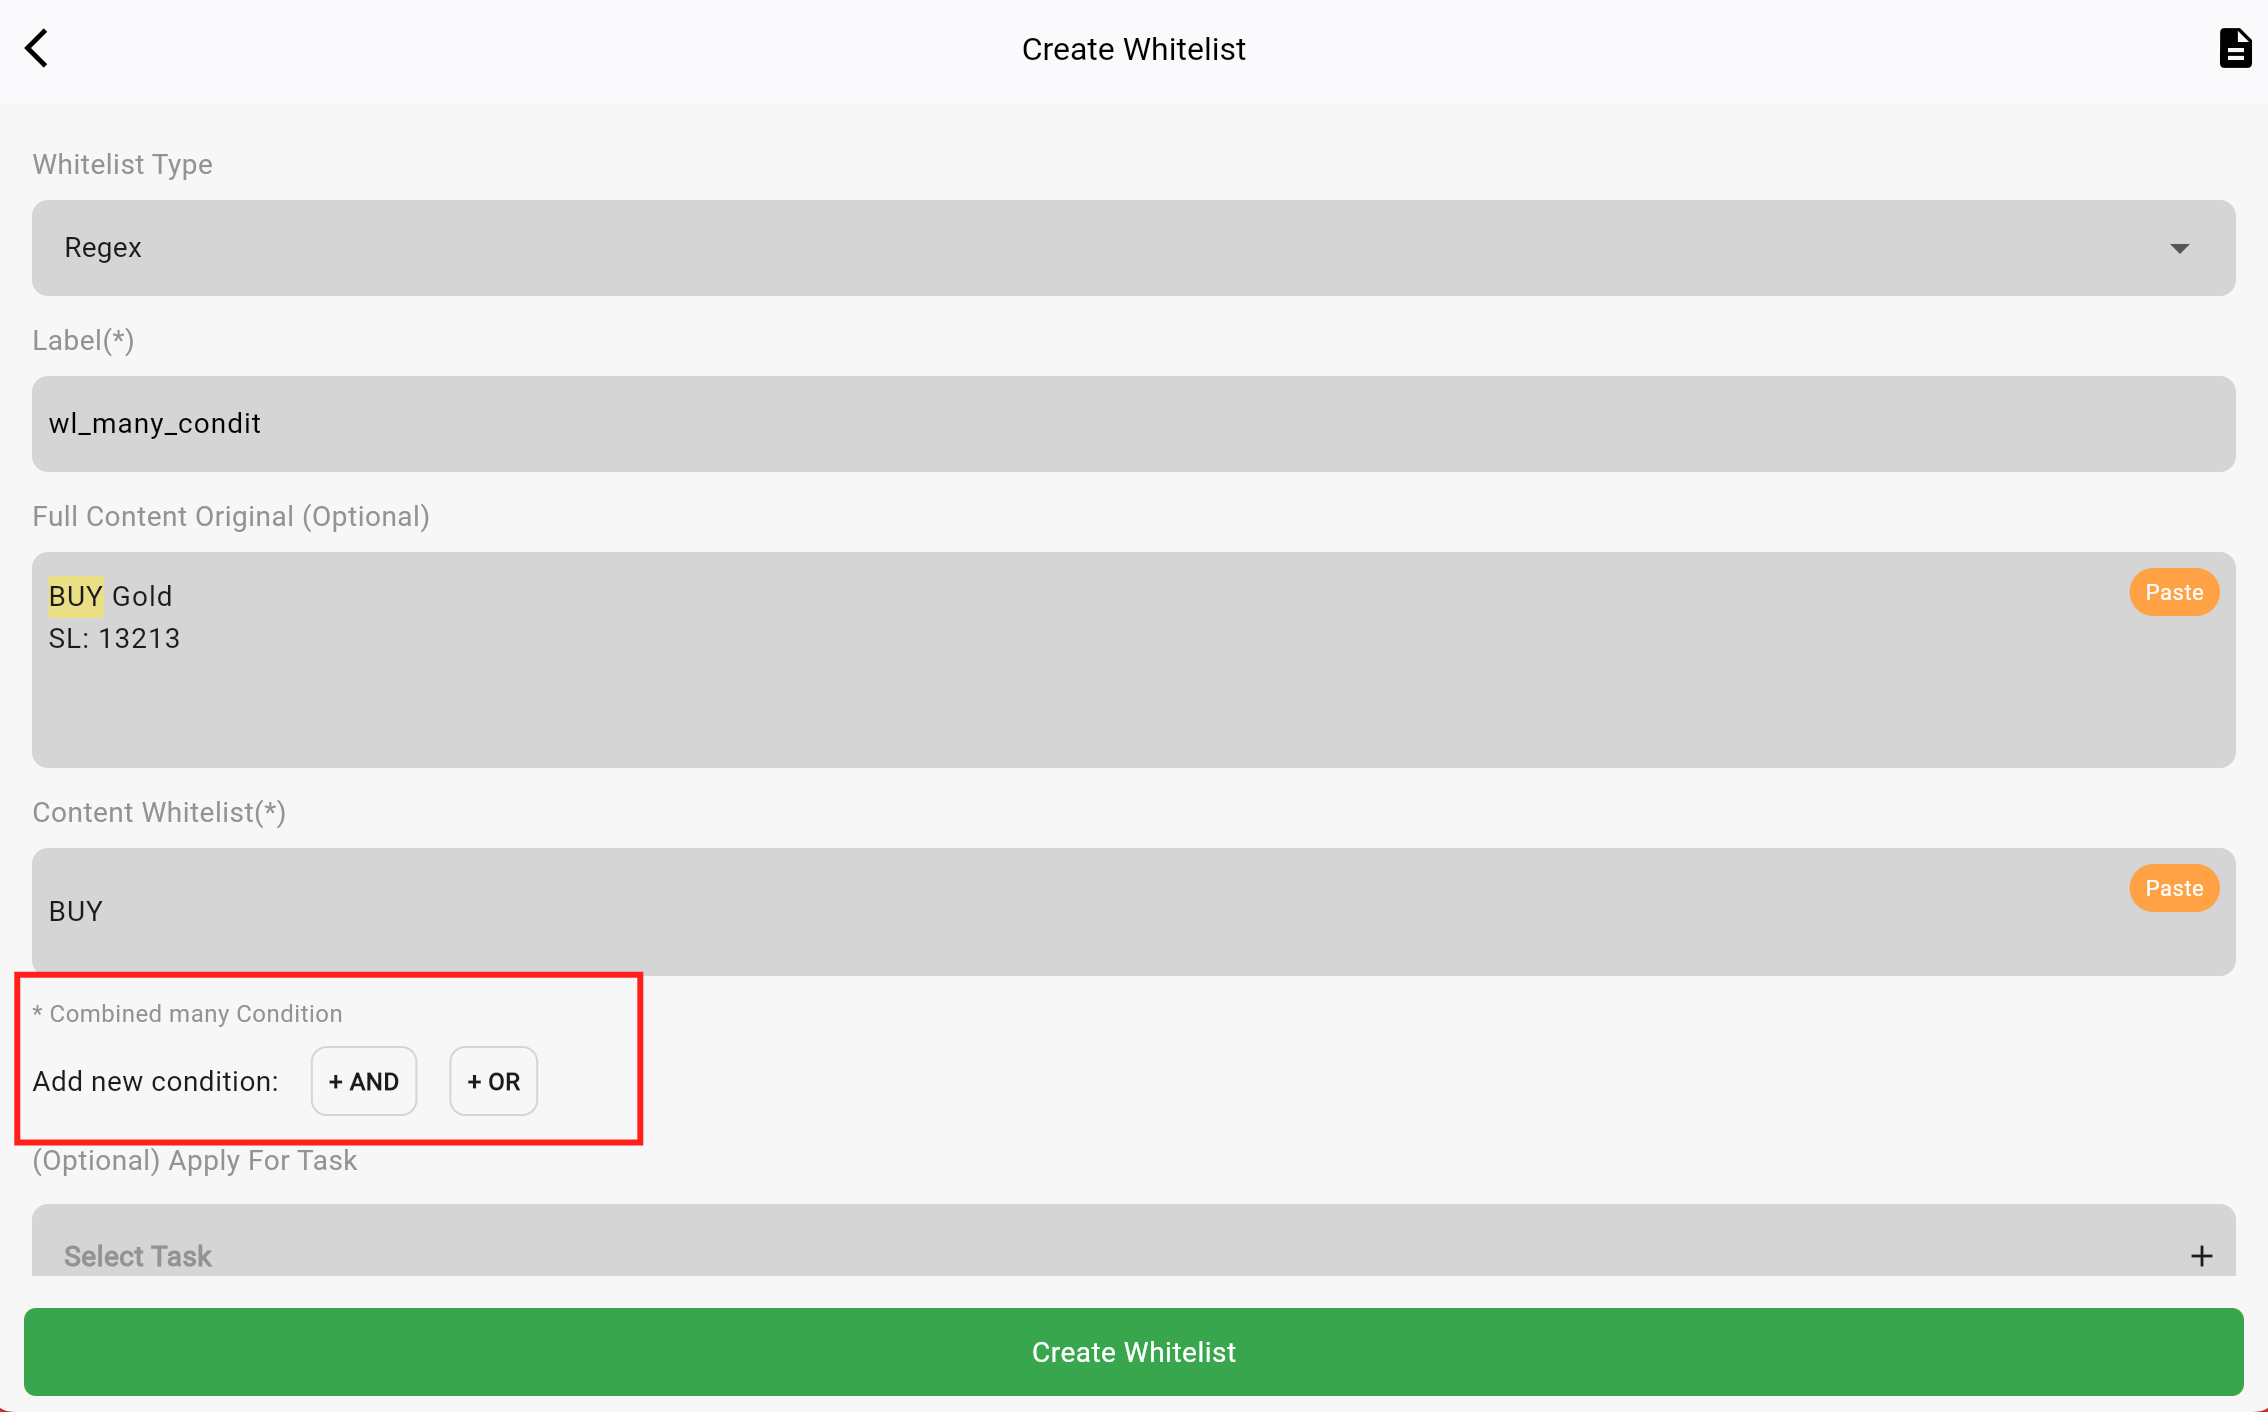
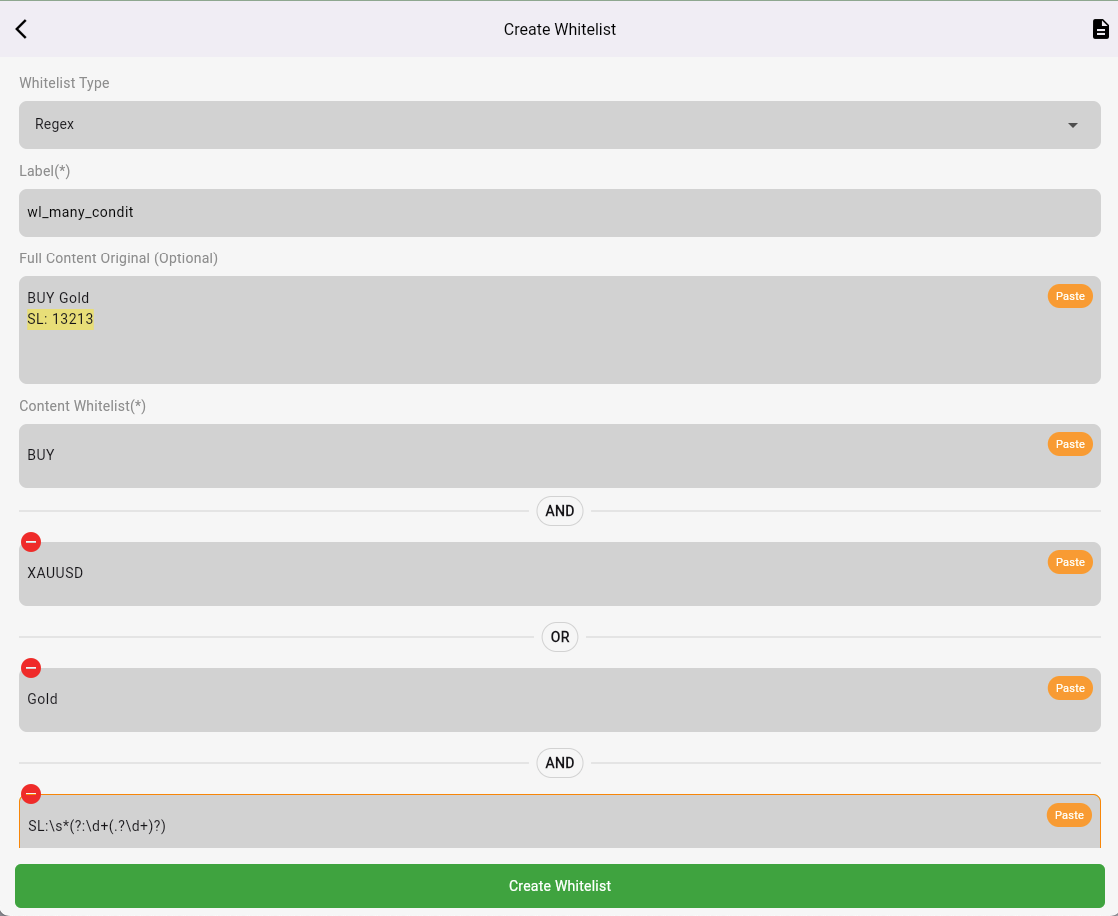
**Combine with many condition AND, OR**
**What are AND and OR Conditions?**
1. **AND Condition**:
* Ensures that all specified conditions must be met for a message to pass the Whitelist filter.
* Example: A message must contain **"BUY"** **and** **"SL: 13213"**.
2. **OR Condition**:
* Ensures that any one of the specified conditions is met for a message to pass the Whitelist filter.
* Example: A message must contain **"BUY"** **or** **"SELL"**.
***
**Add AND/OR Conditions**
1. **To Add an AND Condition**:
* Tap the **+ AND** button to add another condition that must also be met.
* Example: After entering `BUY`, add `SL: 13213`.
**Result**: The message must include both **"BUY"** **and** **"SL: 13213"** to pass the filter.
2. **To Add an OR Condition**:
* Tap the **+ OR** button to add another condition where either can be met.
* Example: After entering `BUY`, add `SELL`.
**Result**: The message must include either **"BUY"** **or** **"SELL"** to pass the filter.
***
#### **Example Scenarios**
* **Forward messages containing Telegram links**
* **Regex Pattern**:
```regex
(telegram.me|t.me)/\w+
```
* **Example Message**:
```vbnet
Join us at https://t.me/example_channel.
```
* **Result**: Forwarded ✅
* **Forward messages containing "black" or "white"**
* **Regex Pattern**:
```regex
(black|white)
```
* **Example Message**:
```csharp
The shirt is black, and the shoes are white.
```
* **Result**: Forwarded ✅
* **Forward messages with the word "es" as a full word**
* **Regex Pattern**:
```regex
\bes\b
```
* **Example Message**:
```csharp
This is es.
```
* **Result**: Forwarded ✅
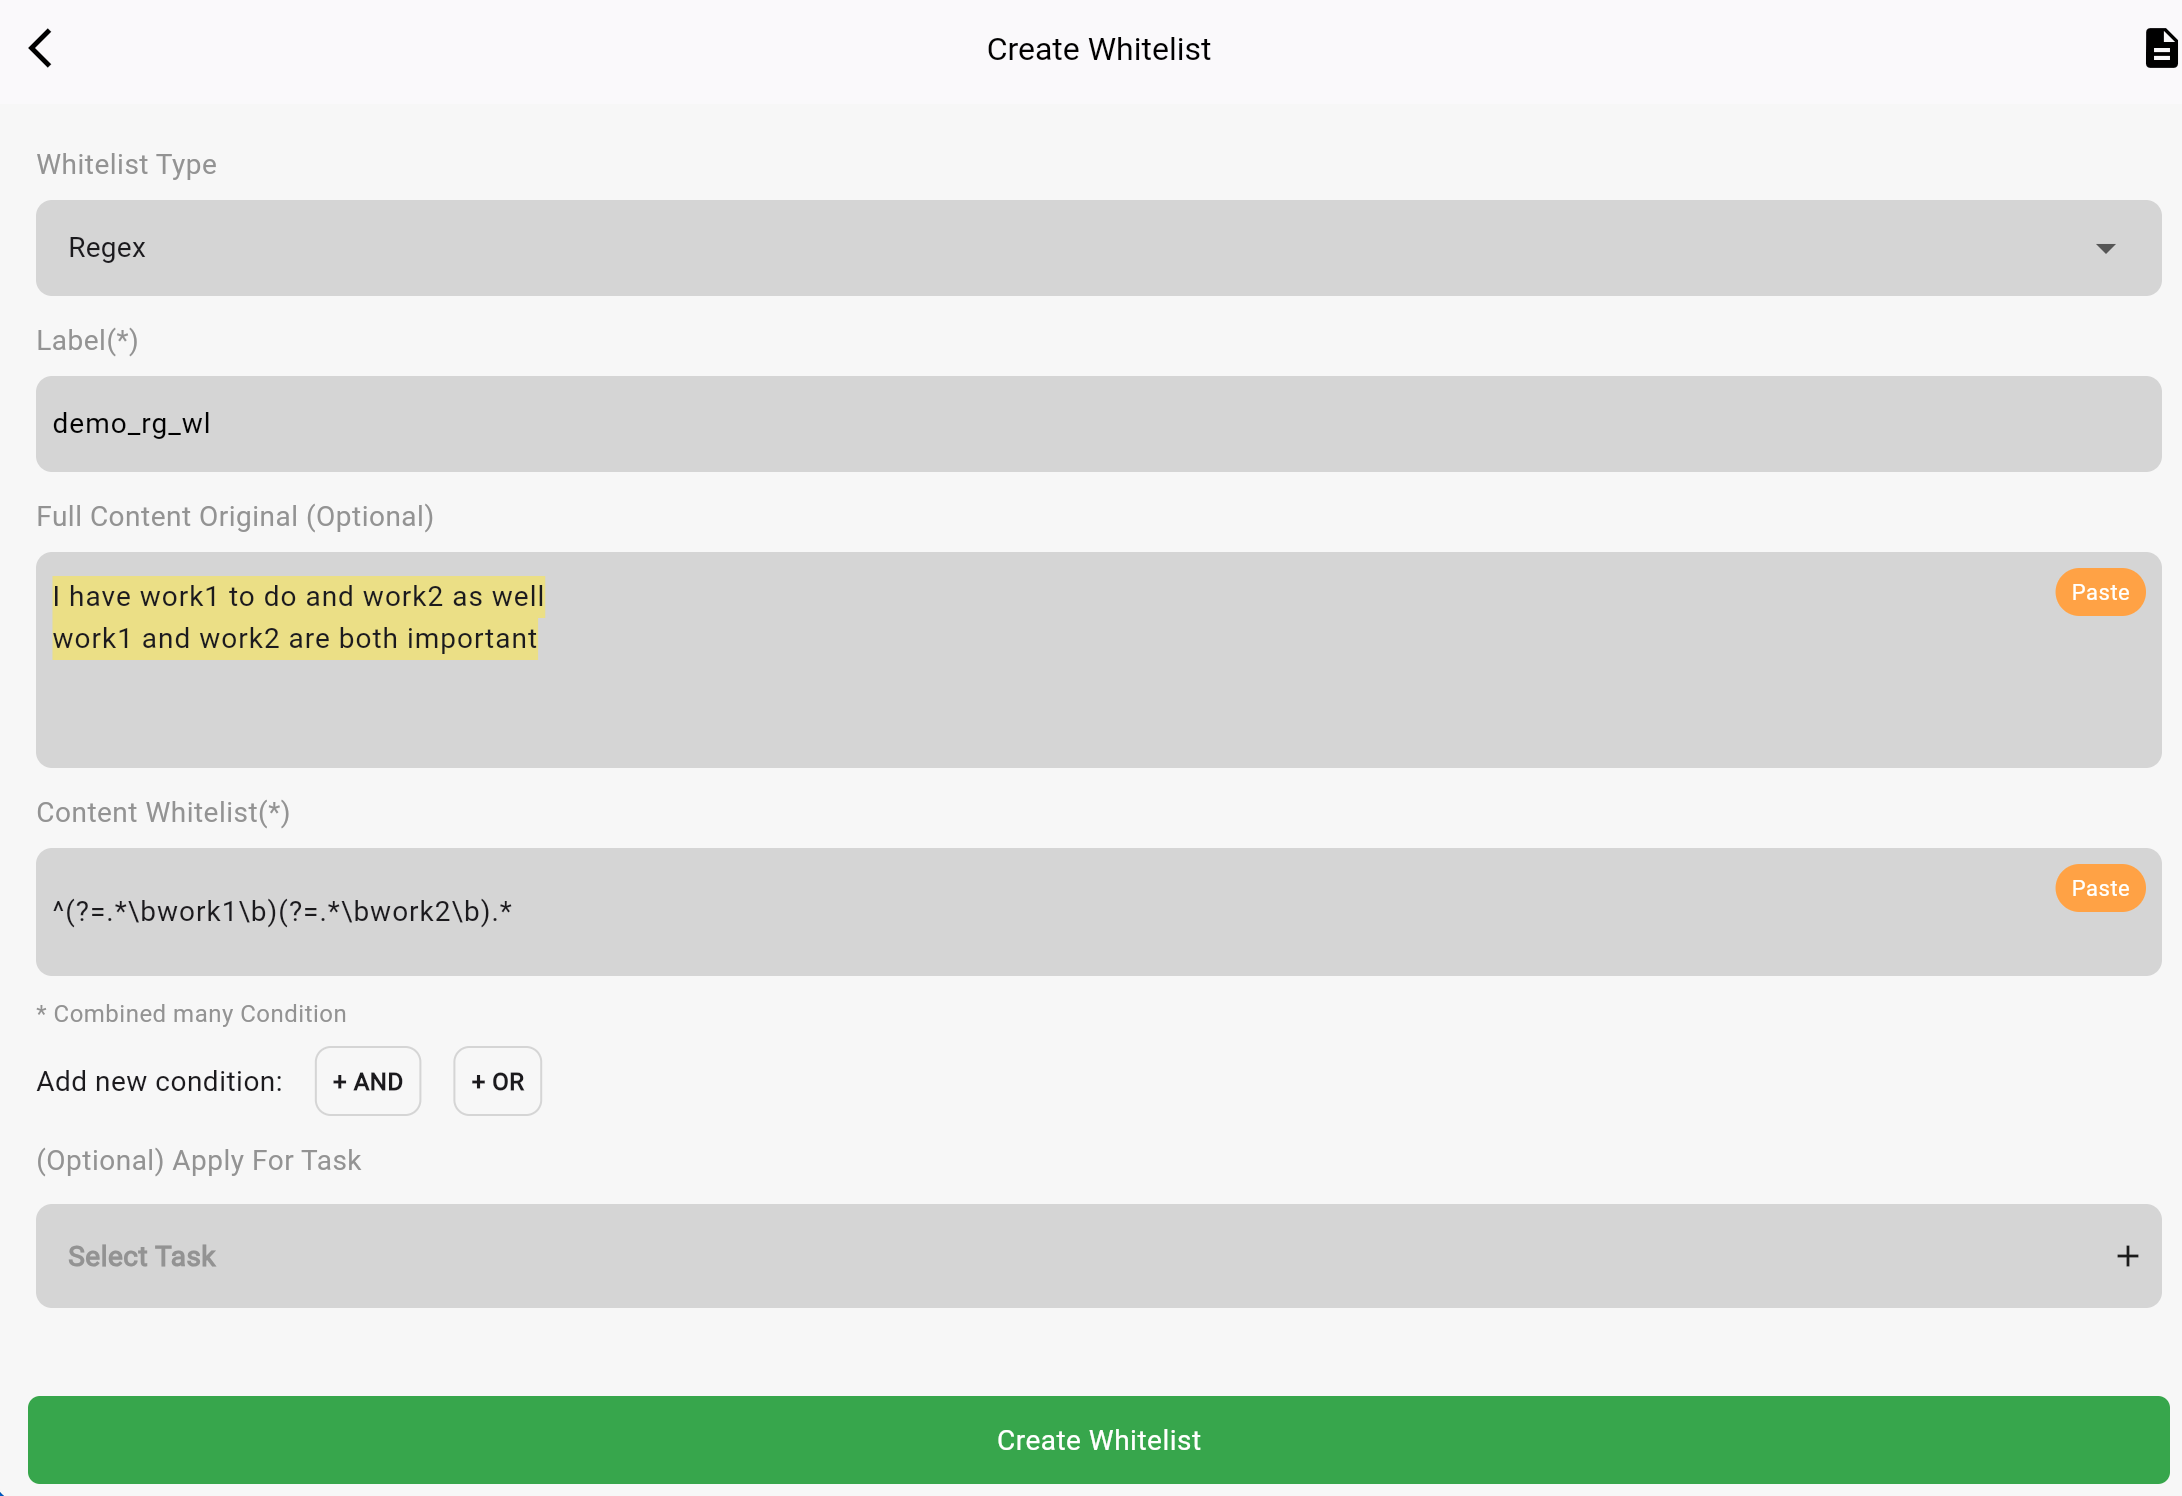
* **Forward messages containing both "work1" and "work2" fully**
* **Regex Pattern**:
```regex
^(?=.*\bwork1\b)(?=.*\bwork2\b).*
```
* **Example Messages**:
* ✅ `I have work1 to do and work2 as well.`
* ✅ `work1 and work2 are both important.`
* ❌ `Only work1 is complete.`
* **Forward messages containing either "red" or "blue"**
* **Regex Pattern**:
```regex
(red|blue)
```
* **Example Message**:
```csharp
The car is blue.
```
* **Result**: Forwarded ✅
***
### **3. Whitelist By User (Platinum Plan Only)**
The **Whitelist By User** feature allows you to forward messages only from specific users, channels, or groups that you select. By using a Whitelist, you can specify which users' messages should be forwarded using their **USER\_ID** or **USERNAME**.
***
#### **How to Use Whitelist By User**
To forward messages only from selected users, follow these steps:
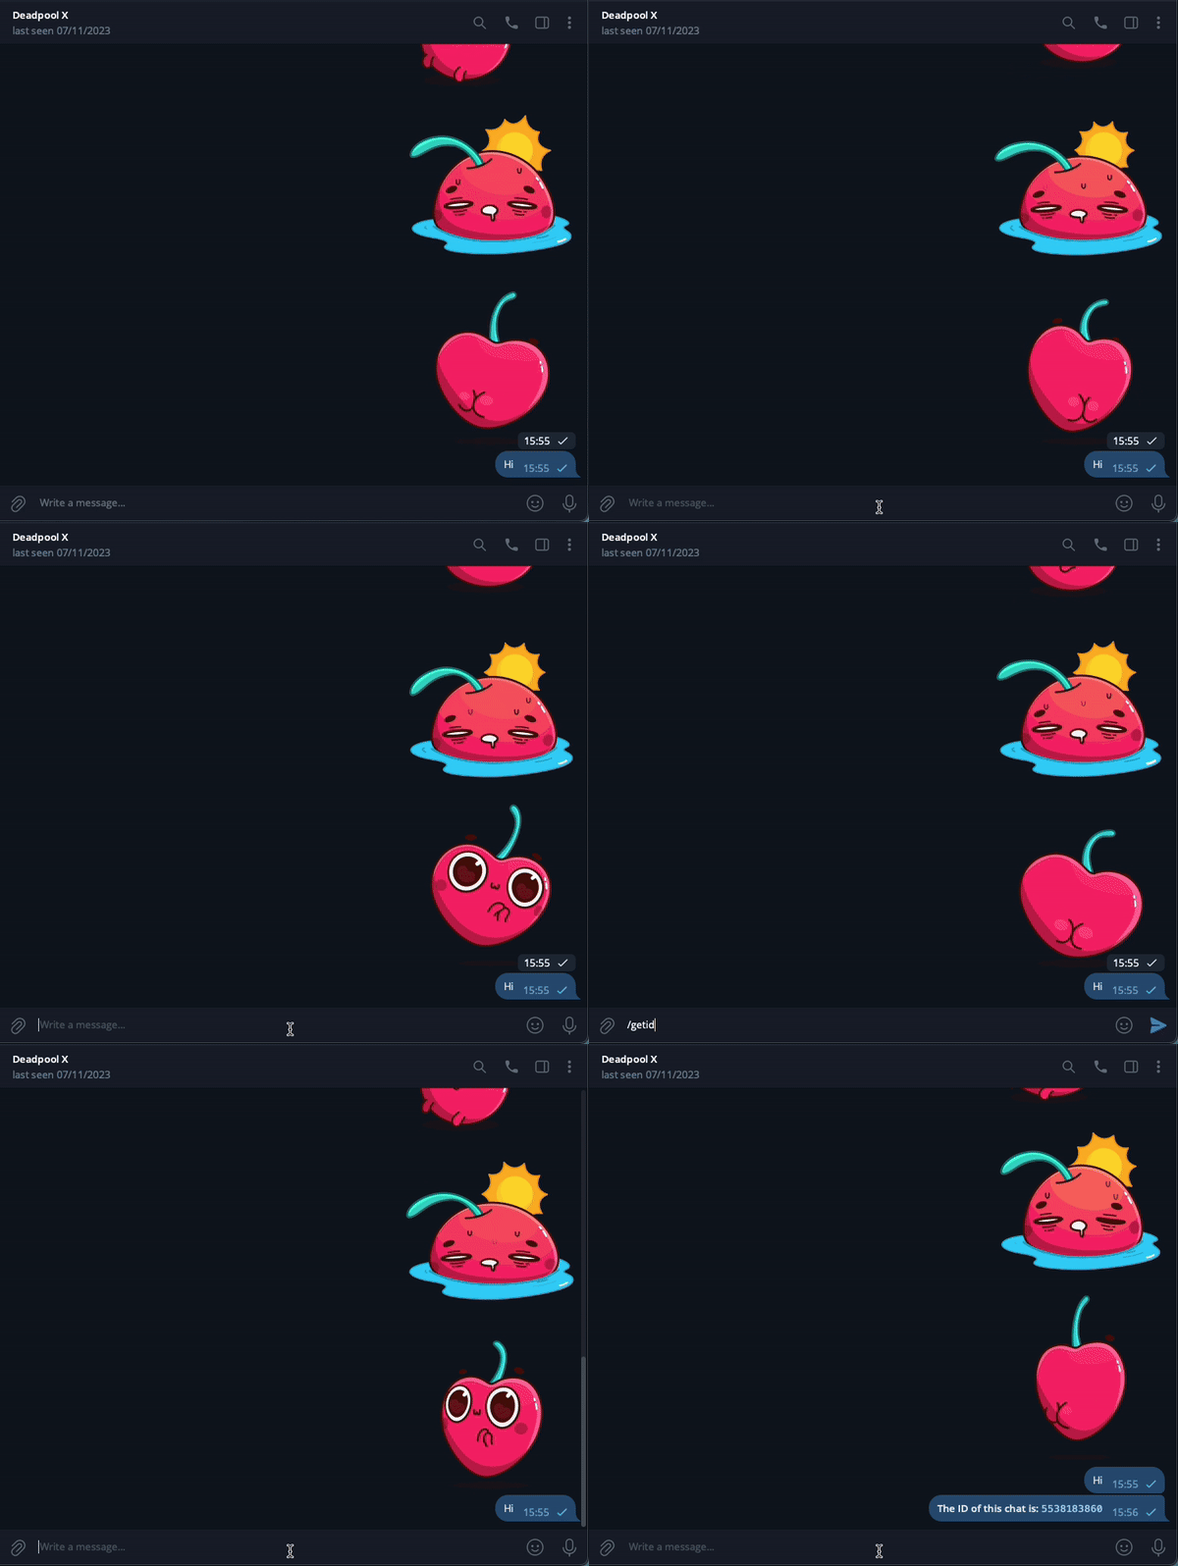
1. **Find the User ID** of the users you want to whitelist:
* Open the chat where you want to forward messages from specific users.
* Use the command **`/getid`** in the chat.
* Note down the **User ID** that appears in the response.
**Example**:
```
/getid
➡️ User ID: 123456789
```
**Note**: Make sure you are using a Telegram account connected to the **AutoForward Telegram Bot** to execute the **/getid** command.
2. **Create a Whitelist Rule** in the app:
* Go to **Dashboard** → Tap on **Whitelist** → **Add New**.
* Select **Whitelist By User** as the **Whitelist Type**.
* In the **Content Whitelist** field:
* Enter the **User ID** (e.g., `123456789`) or the **Username** (e.g., `@trusted_user`).
* Tap **Create Whitelist** to save the rule.
***
#### **Example Scenario**
**Use Case**: Forward messages only from a trusted user.
* **Content Whitelist**: `123456789` or `@trusted_user`
* **Example Message**:
```
Hello, here is the latest report.
```
* **Result**:
* If sent by the whitelisted user (`123456789` or `@trusted_user`): Forwarded ✅
* If sent by any other user: Blocked ❌
***
#### **Why Use Whitelist By User?**
* Allows you to control and limit message forwarding to trusted users only.
* Ensures your forwarded messages are from verified and relevant sources.
* Enhances filtering accuracy by targeting specific **User IDs** or **Usernames**.
***
## **5.** Apply/Disable Replace For a Task
The **Whitelist** feature allows you to control which messages are forwarded based on **keywords, regex patterns, or specific users**. This guide explains how to apply or disable Whitelist rules for individual tasks or globally across all tasks.
#### **Step 1: Access the Whitelist List**
1. From the **Dashboard**, select the **Whitelist** feature.
2. You will see a list of all previously created **Whitelist rules**.
***
#### **Step 2: Select a Whitelist Rule**
1. Locate the Whitelist rule you want to manage.
2. Tap or click on the rule.
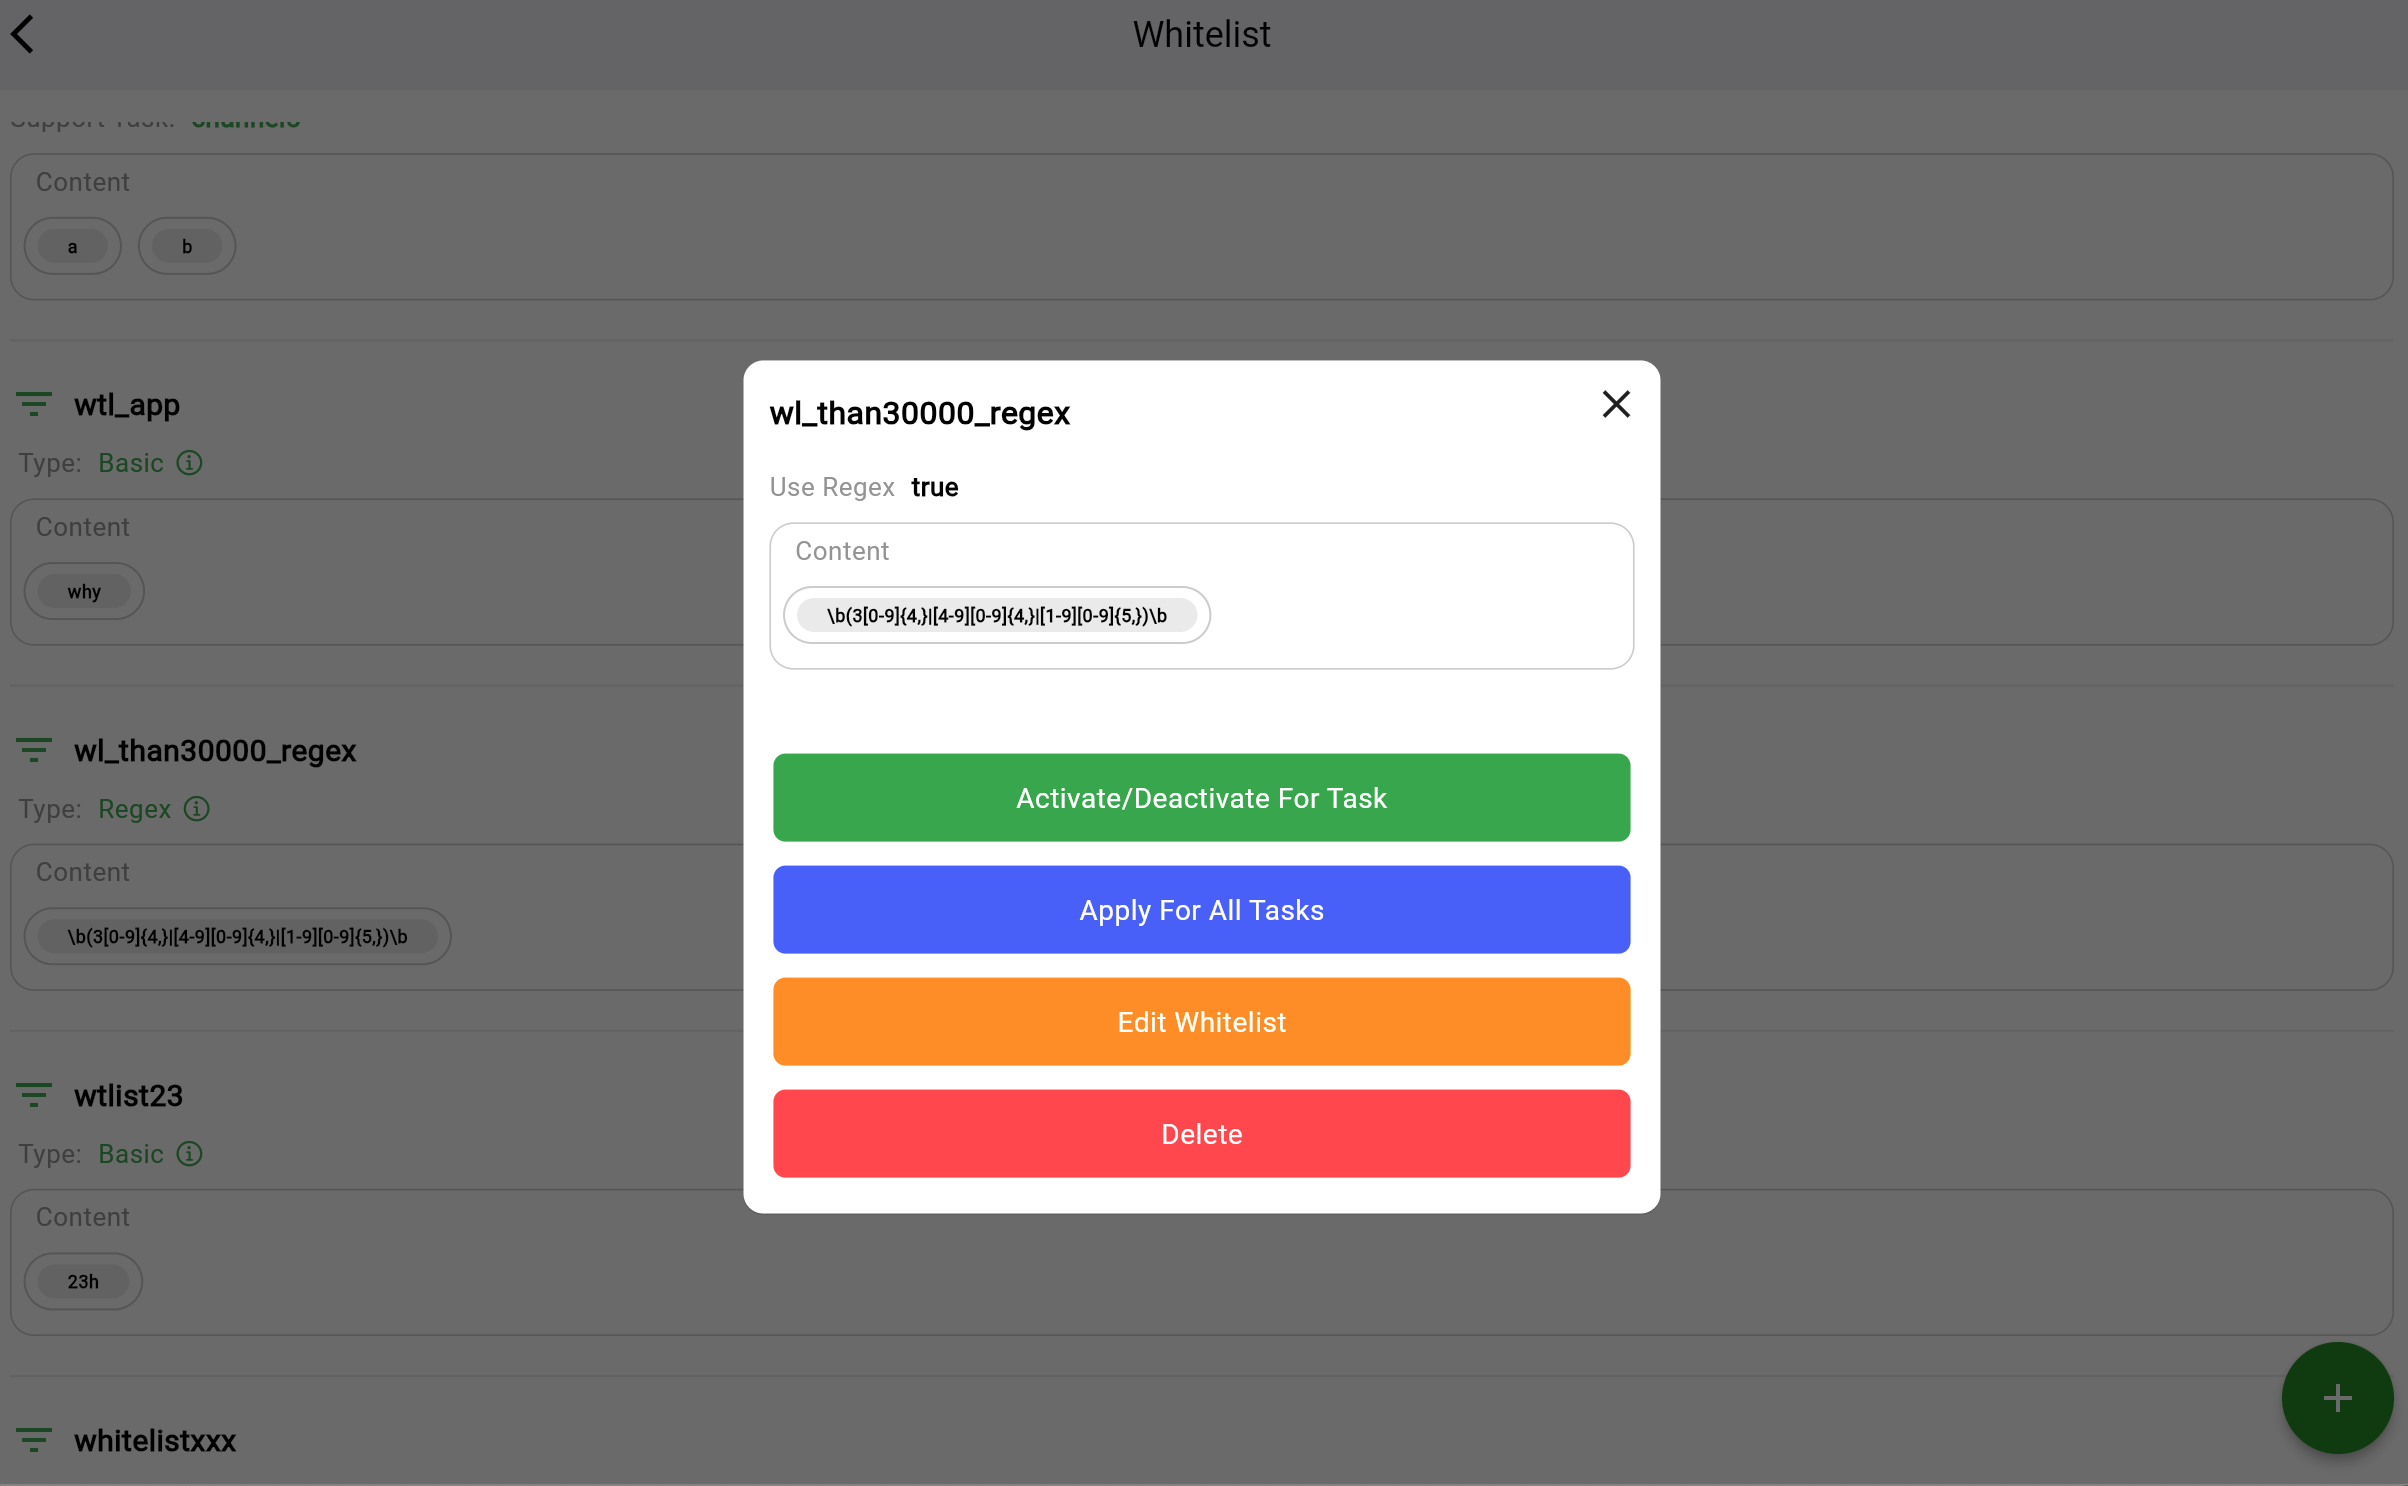
A **popup window** will appear, displaying the details of the selected Whitelist rule.
***
#### **Step 3: Manage the Whitelist Rule for Tasks**
In the popup window, the following options are available:
1. **Activate/Deactivate For Task** (Green Button)
* Use this option to enable or disable the Whitelist rule for a specific task.
* If the rule is already **active**, clicking this will deactivate it for the selected task.
* If the rule is **inactive**, clicking this will activate it for the selected task.
***
2. **Apply For All Tasks** (Blue Button)
* This option allows you to apply the Whitelist rule to **all existing tasks**.
* Use this feature when you want the Whitelist rule to work globally across all tasks.
***
3. **Edit Whitelist** (Orange Button)
* Tap this option to **edit the Whitelist rule**.
* You can update the label, content keywords, regex patterns, or user-specific rules.
***
4. **Delete** (Red Button)
* Use this option to **delete** the Whitelist rule permanently.
* Be cautious: once deleted, the rule cannot be recovered.
## **6. Tips for Using Whitelist**
1. Use **Basic** for simple word-based filtering.
2. Use **Regex** for more complex patterns (e.g., URLs, mentions, or exact word matches).
3. Be precise with Regex to avoid matching unintended content.
4. Test your Regex patterns on [regex101.com](https://regex101.com) before applying them.
5. Add clear and descriptive **Labels** for easier rule management.
***
### **Why Use Whitelist?**
* Ensure only relevant content is forwarded.
* Filter messages based on specific words, patterns, or trusted users.
* Improve control and accuracy of message forwarding.